Thursday, October 29, 2009

Crêpes


Ingredients:
-4 eggs

-¼ teaspoon salt

-2 cups flour

-2 ¼ milk

-¼ cup (½ stick) melted butter or margarine


Utensils:
A whisk, wooden spoon, fork, electric mixer, or eggbeater, a bowl to mix the crepe batter, plastic spatula, 8 inch non-stick skillet, a tupperware to store leftover batter.


Instructions:

1. Gather your ingredients.
2. Break four eggs into a bowl.
3. Add 1/4 teaspoon of salt to your eggs.
4. Whisk your eggs and salt together until the egg looks uniformly yellow.
5. Measure two cups of flour.
6. Add some of the flour to the egg mixture.
7. Whisk the flour into the eggs. It will be a bit lumpy right now, but that's okay.
8. Whisk some of the milk into the batter. It will get thinner. Keep adding milk and flour alternately until you've added it all.
9. Whisk the batter until it is smooth, like it looks here. It shouldn't take more than a minute or two to whisk it smooth, from the time you started to add the flour.
10. Add the melted butter to the batter, and again whisk it until it's smooth.
11. Cover the batter.
12. Put the batter in the refrigerator.


At this point, your batter is ready to go, and you can begin making the crepes whenever you are ready. I've kept my batter for several days, and it has been fine. After a couple of days, the batter gets a bit darker in color, but the crepes still taste fine.


Cooking the Crepes

1. Select an eight inch non-stick skillet. You don't need a fancy crepe pan.
2. Preheat your pan on medium heat. I use about one-fourth of a cup of batter to make a crepe in this size pan.
3. Pour the batter into the pan.
4. As you pour the batter, twirl the pan around.
5. As you twirl the pan, the batter coats it and makes the crepe.
6. As the crepe cooks, it changes in appearance. You can usually see a lace pattern developing on the underside of the crepe.
7. This is what the crepe looks like when it has set. Notice you can see the spatula through the crepe, and this isn't a particularly thin crepe either. The crepe will also usually slide around when it is ready.
8. Slip the spatula under the crepe. Sometimes you need to poke it a bit. If it helps to pick up the edge of the crepe with your fingers, do it.
9. Flip the crepe over. Look at that nice lace pattern on the crepes. If you're skillful, you can flip the crepe with a quick action of the wrist and no spatula.
10. After the second side has cooked for maybe twenty seconds, slip it out of the pan onto a plate for serving.
11. Not all crepes come out in pretty circles. Usually my first one looks awful and falls apart because I didn't let the pan get hot enough. That's okay, sprinkle some sugar on it...
12. ...and feed it to someone you love.


BREAD


Ingredients:


  • 3/4 cup warm water

  • 1 package active dry yast

  • 1tsp salt

  • 1-1/2 tbsp sugar

  • 1 tbsp vegetable shortening

  • 1/2 cup milk

  • 3 cups all-purpose flour, approximately

Preparation:


1- In large bowl, add the warm water. Slowly stir in dry yeast. Continue to stir until yeast is dissolved


2- Add salt, sugar, shortening, and mild to bowl. Stir.


3- Mix in the first 2 cups of flour.


4- If needed, begin adding more flour, one tablespoon at a time, until the dought chases the spoon around the bowl.


5- You do not need to use up all the flour called for in this recipe, or you may need more flour than called for. The amounts vary depending on many factors, including weather, which is why most bread recipes only give an approximate amount of flour needed.


6- Turn dough out onto floured board and knead, adding small spoonfuls of flour as needed, until the doug is soft and smooth, not sticky to the touch.


7- Put dough in buttered bow., turn dough over so that the top of dough in greased. Cover and let rise in warm spot for 1 hour.


8- Punch down dough. Turn out onto floured board and knead.


9- Preheat oven at 375 degrees F.


10- Form dough into loaf and set in buttered pan. Cover and let rise for obout 30 minutes.


THIN CRUST DOUGH


THIN CRUST DOUGH


Ingredients Required


  • 1 envelope of dry yeast
  • 1/4 teaspoon of sugar
  • 3/4 cup of lukewarm water
  • 1 3/4 cups of unbleached plain flour
  • 1/2 teaspoon of salt

Step by Step Procedure


  1. Combine 1 envelope of dry yeast, 1/4 teaspoon of sugar and 3/4 cups of lukewarm water. Mix a little and let sit for 6-8 minutes.
  2. Combine 1 3/4 cups of unbleached plain flour with 1/2 teaspoon of salt in a bowl or food processor.
  3. Pour the water combination into the bowl (or food processor) and mix until ready to knead (around 30 second in a food processor). If using a bowl, mix with a spoon until you have a neat ball.
  4. Prepare a lightly spinkled surface with flour. Turn out dough and knead for around 2-3 minutes. Lightly cover your finger tips with flour if the mixture is a little sticky.
  5. Roll out by hand for a 12'' base.
  6. Place in 12'' lighly oiled oven pan. Press out dough to form a slight lip.
  7. Prepare and apply your sauce and topping or choice.
  8. Cook in a pre-heated over (500F) for 8-12 minutes (times may vary based on different ovens. Fan assited oven will be quicker!).
  9. Remove from oven, slice and share with your favourite friends and/or family members :)

Additional Information


  • As stated above, fan assisted ovens tend to cook pizza's quicker than traditional ovens.
  • You can usually reheat your pizza in around 5 minutes. But beware that it's not advisable to reheat pizzas with a meat topping.

Saturday, October 24, 2009

Apple pastry

Ingredients
- 2 sheets puff pastry
- 6 or 7 Apples
- 1 tablespoon sugar
- 2 tablespoon butter
- ¾ teaspoon cinnamon
- ¾ teaspoon grated nutmeg
- 1 egg


Apple pastry

Ingredients

- 2 sheets puff pastry
- 6 or 7 Apples
- 1 tablespoon sugar
- 2 tablespoon butter
- ¾ teaspoon cinnamon
- ¾ teaspoon grated nutmeg
- 1 egg


Saturday, October 10, 2009

FISH & SEAFOOD


MILK & BY-PRODUCTS


English vocabulary for the kitchen

Some people have a fitted kitchen, where all the kitchen units have been bought together, and they are assembled according to a plan. Other people have a kitchen where the units are free-standing: not necessarily bought together at one time.In a kitchen you are likely to find cupboards (or cabinets), either at floor level, or at eye level. In the eye level cupboards you will probably find dry goods (such as flour, sugar, rice, pasta, spices) and maybe glasses and crockery (plates, bowls etc). In the floor level cupboards you might find pots and pans: saucepans for cooking pasta etc; frying pans for frying food; baking tins and roasting tins for cooking food in the oven; and serving dishes made from glass or china. You could also find other kitchen implements such as a blender (= food processor) and kitchen scales (for measuring and weighing food). Often the top part of a floor level cupboard has a drawer, where various items are kept, such as cutlery (knives, forks and spoons); aluminium foil (metal paper), cling film (thin plastic wrap), freezer bags, and other kitchen items such as a bread knife, tin opener, corkscrew (to open bottles of wine), potato peeler (to take the skin off potatoes), a rolling pin (to roll out pastry) and so on.
On the top of the floor level cupboards you often find a worktop or work surface, where you can prepare food. These surfaces are sometimes made of marble, or hard wood, and they can be easily cleaned. Some people keep a toaster or microwave on the work surfaces, along with things they need frequently, such as oil, salt, or various sauces.
Most kitchens also contain a cooker with an oven and four rings, (although some modern cookers are split level, where the oven is separate from the rings), a fridge-freezer, and perhaps a dishwasher or even a washing machine. You'll probably find a kitchen sink, where you wash the plates and dishes, and larger kitchens also contain a kitchen table and chairs, so you can eat in the same room

Friday, October 2, 2009

Types of breas

SWEETS


CRISTIAN QUICENO MORALES 2N

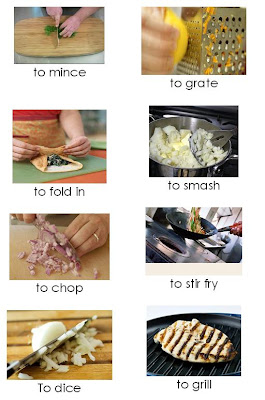
KITCHEN TECHNIQUES II


Laura Canut Tomàs
Maria Ribera Ruché
2n ESO